How to call the AvelinLabs API: from registration to your first response
A workforce intelligence API is only useful when a developer can move from an empty terminal to a meaningful response without guessing what happens between registration, authentication, and the first request.
This guide walks through that complete path with the public AvelinLabs API examples. You will create and verify an account, generate the correct kind of API key, run a compact occupation-classification request, expand to a richer role analysis, and identify the next endpoint that fits your use case.
The production API base URL is:
https://api.avelinlabs.comAvelinLabs is currently in public beta. Treat the responses as decision-support signals, keep human review in the workflow, and use the public API documentation as the contract reference.
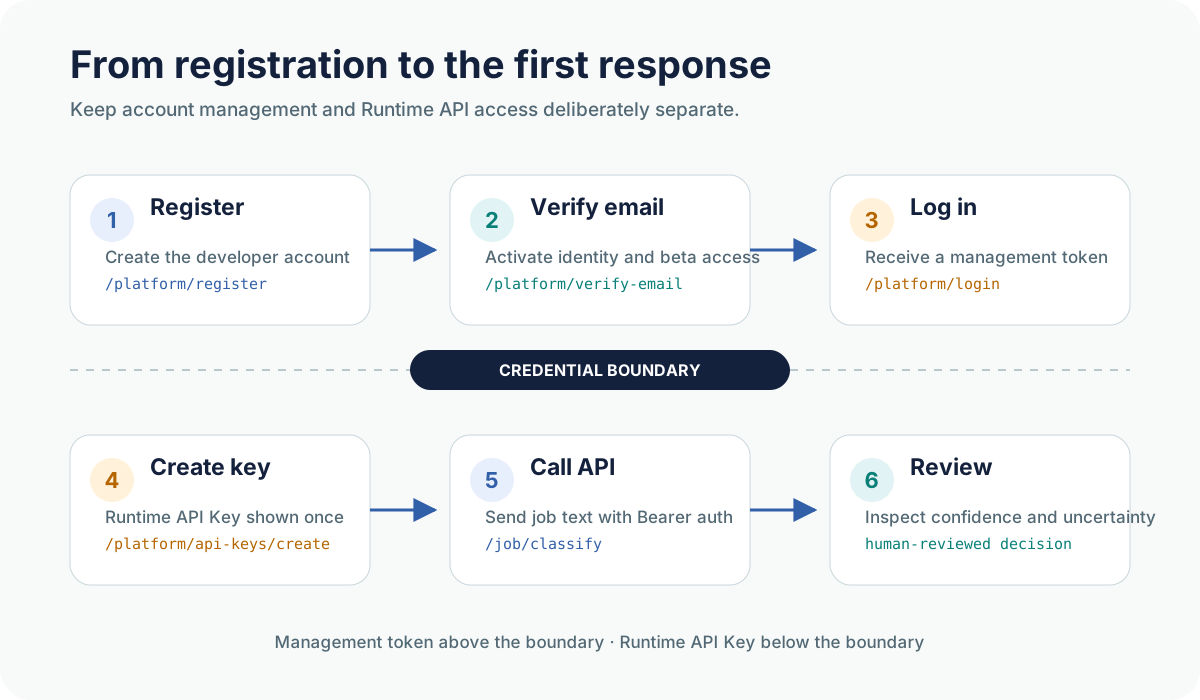
The account lifecycle and the Runtime API remain deliberately separate. The credential used to manage your account is not the credential used to call product endpoints.
What you will complete
Section titled “What you will complete”By the end of the guide, you will have:
- a verified AvelinLabs developer account;
- an active beta contract created through email verification;
- a Runtime API Key stored outside the repository;
- a successful call to
POST /api/v1/job/classify; - a path to
POST /api/v1/job/analyzeand the wider API surface.
You need Python 3, Git, access to your email inbox, and a safe place to store the Runtime API Key. The examples use the Python requests package.
Step 1: clone the public examples
Section titled “Step 1: clone the public examples”The examples repository contains runnable Python, Bash/cURL, PowerShell, Command Prompt, Postman, payload, and response examples.
macOS or Linux
Section titled “macOS or Linux”git clone https://github.com/AvelinLabs/avelinlabs-api-examples.gitcd avelinlabs-api-examplespython3 -m pip install -r requirements.txtWindows PowerShell
Section titled “Windows PowerShell”git clone https://github.com/AvelinLabs/avelinlabs-api-examples.gitSet-Location avelinlabs-api-examplespy -3 -m pip install -r requirements.txtThe repository defaults to the production base URL, so you do not need to change a configuration file for the first evaluation.
Step 2: register and verify the account
Section titled “Step 2: register and verify the account”The safest quickstart is the interactive onboarding script:
macOS or Linux
Section titled “macOS or Linux”python3 python/platform_onboarding.pyWindows PowerShell
Section titled “Windows PowerShell”py -3 python/platform_onboarding.pyThe script asks for your email, password, full name, and company name. It then calls:
POST /api/v1/platform/registerRegistration deliberately returns a generic response. This prevents the endpoint from revealing whether an email address already belongs to an account.
Check your inbox after registering. Email verification activates the developer identity and provisions beta access when there is no current active or trial contract. You can follow the verification link in the email, or paste the verification token into the onboarding script when prompted.
The verification request is:
GET /api/v1/platform/verify-email?token=...A verification token is a credential. Do not place it in documentation, screenshots, source control, shared terminal history, or application logs.
Step 3: understand the two credentials
Section titled “Step 3: understand the two credentials”This distinction prevents one of the most common integration mistakes.
| Credential | How you obtain it | What it is for |
|---|---|---|
| Management bearer token | Returned by POST /api/v1/platform/login | Account, contract, usage, and API-key management |
| Runtime API Key | Created through POST /api/v1/platform/api-keys/create | Product endpoints such as classify, analyze, occupation, market, and Workforce Evidence Packs |
The onboarding script logs in after verification:
POST /api/v1/platform/loginIt uses the resulting management bearer token to create a Runtime API Key:
POST /api/v1/platform/api-keys/createThe raw Runtime API Key is shown only once. Copy it immediately to an approved secret store or local environment variable. Do not commit it to Git, embed it in client-side JavaScript, paste it into an issue, or reuse the management token on Runtime endpoints.
Step 4: set the Runtime API Key
Section titled “Step 4: set the Runtime API Key”The example scripts read two environment variables:
BASE_URL, which defaults tohttps://api.avelinlabs.com;AVELIN_API_KEY, which must contain the Runtime API Key.
macOS or Linux
Section titled “macOS or Linux”export BASE_URL="https://api.avelinlabs.com"export AVELIN_API_KEY="replace-with-your-runtime-api-key"Windows PowerShell
Section titled “Windows PowerShell”$env:BASE_URL = "https://api.avelinlabs.com"$env:AVELIN_API_KEY = "replace-with-your-runtime-api-key"Windows Command Prompt
Section titled “Windows Command Prompt”set "BASE_URL=https://api.avelinlabs.com"set "AVELIN_API_KEY=replace-with-your-runtime-api-key"Environment variables are convenient for a local evaluation, but they are not a complete production secret-management strategy. Use the secret facility provided by your deployment environment for an application integration.
Step 5: make the first call
Section titled “Step 5: make the first call”Start with /job/classify. It returns a compact top occupation result and the review signals associated with that result.
The repository includes this payload in payloads/job-classify.json:
{ "title": "Help Desk Technician", "description": "Resolve user support issues, troubleshoot hardware and software problems, document incidents, and escalate complex tickets.", "debug": false}Run it with Python:
macOS or Linux
Section titled “macOS or Linux”python3 python/job_classify.pyWindows PowerShell
Section titled “Windows PowerShell”py -3 python/job_classify.pyOr call the endpoint directly with cURL:
curl -sS \ -X POST "https://api.avelinlabs.com/api/v1/job/classify" \ -H "Authorization: Bearer ${AVELIN_API_KEY}" \ -H "Content-Type: application/json" \ --data-binary "@payloads/job-classify.json"In Windows PowerShell, use the native PowerShell example or call curl.exe explicitly. This avoids depending on PowerShell alias behavior.
Step 6: read the response as decision support
Section titled “Step 6: read the response as decision support”A successful classification identifies the most plausible O*NET occupation for the submitted text. The exact values can evolve with the input and the current beta implementation, but the response is designed to expose more than a label.
Review these fields first:
occupation.onet_codeandoccupation.title: the standardized occupation result;confidenceandconfidence_level: strength signals for the result, not guaranteed probabilities;uncertainty: the amount of unresolved ambiguity;is_ambiguous: whether the role may span multiple plausible interpretations;job_signals: task, skill, tool, or domain cues detected in the input;decision: workflow-routing guidance where returned.
The public repository includes an illustrative classification response. Do not hard-code its numeric values into tests. Validate the response structure and apply your own review policy to live results.
A routing label such as AUTO_ACCEPT means that configured thresholds support low-risk workflow handling where customer policy permits it. It is not an automated hiring decision.
Step 7: move from classify to analyze
Section titled “Step 7: move from classify to analyze”Use /job/analyze when one top occupation is not enough. It returns ranked occupation candidates with richer confidence, evidence, skill, explanation, and review-relevant context.
The public example uses a Data Analyst payload:
{ "title": "Data Analyst", "description": "Build SQL dashboards, analyze business metrics, create reports in Power BI, and communicate insights to stakeholders.", "debug": false}Run it with:
macOS or Linux
Section titled “macOS or Linux”python3 python/job_analyze.pyWindows PowerShell
Section titled “Windows PowerShell”py -3 python/job_analyze.pyOr:
bash curl/job-analyze.shThe practical difference is simple:
- choose
/job/classifywhen your workflow needs one compact top result; - choose
/job/analyzewhen a reviewer needs ranked alternatives, supporting skill signals, explanations, confidence, and uncertainty.
The annotated Job Analyze response explains the main fields in plain English.
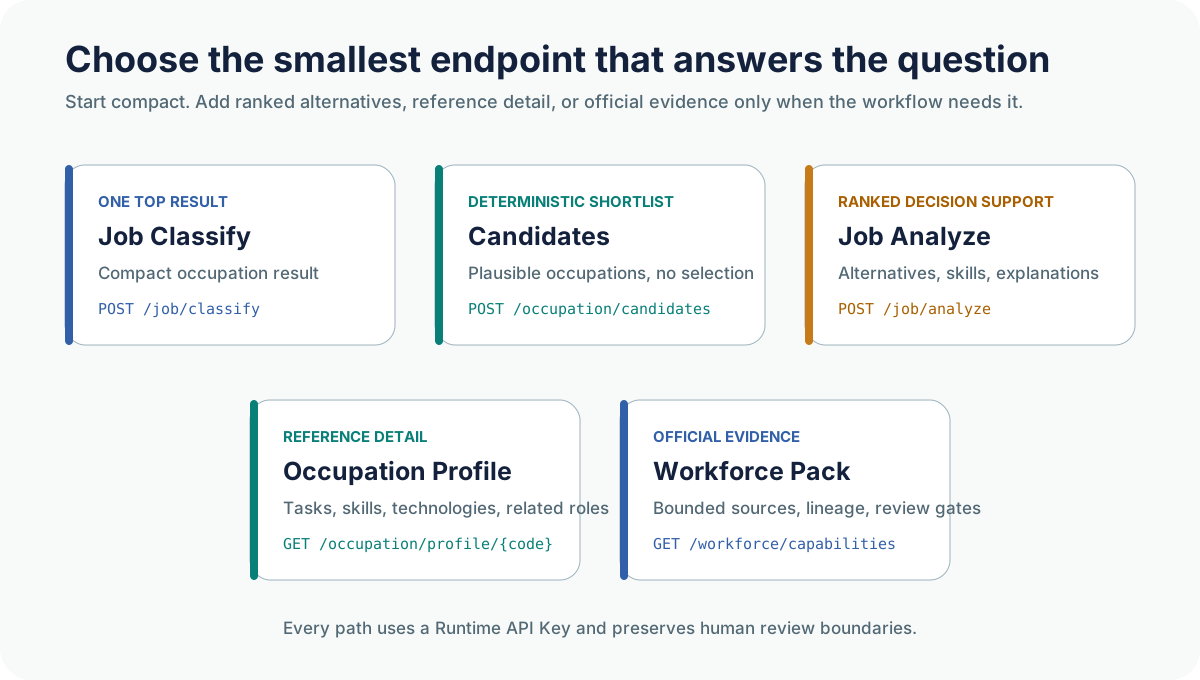
Start with the smallest endpoint that answers the decision question. Expand the workflow only when the next layer of evidence is useful.
Step 8: choose the next endpoint deliberately
Section titled “Step 8: choose the next endpoint deliberately”Once the first request works, choose the next endpoint by the question your application must answer.
| Question | Endpoint |
|---|---|
| What is the single best-fit occupation for this job text? | POST /api/v1/job/classify |
| What plausible occupations and supporting signals should a reviewer inspect? | POST /api/v1/job/analyze |
| What deterministic shortlist should be considered without selecting a mapping? | POST /api/v1/occupation/candidates |
| What tasks, skills, technologies, and related occupations describe this O*NET code? | GET /api/v1/occupation/profile/{onet_code} |
| What official evidence is available for a governed workforce-investment question? | Start with GET /api/v1/workforce/capabilities |
| How can customer role frameworks or criteria ground the result? | Follow the Customer Grounding guide |
The occupation-candidate endpoint is intentionally separate from classification. It returns an explainable shortlist, does not select or persist a mapping, and does not invoke OpenAI.
Workforce Evidence Packs also preserve a separate boundary: OEWS occupation evidence, QWI industry flows, and O*NET reference profiles are not treated as interchangeable data.
Step 9: handle errors without losing the trace
Section titled “Step 9: handle errors without losing the trace”If a request fails, keep the returned request_id. It helps correlate the client-visible error with operational evidence without logging the secret itself.
The examples repository includes:
python3 python/error_invalid_api_key.pyThat example verifies the standard HTTP 401 envelope. A rejected request should lead you to inspect the credential type, expiration, authorization header, and endpoint path—not to print the raw key into logs.
A production-minded checklist
Section titled “A production-minded checklist”Before moving beyond evaluation:
- keep Runtime API Keys on the server side;
- separate development, test, and production credentials;
- store the raw key immediately because it is shown once;
- preserve request identifiers;
- ignore unknown additive response fields;
- avoid dependencies on debug-only fields;
- route lower-confidence, ambiguous, or higher-uncertainty results to human review;
- treat submitted job text and returned intelligence as customer data;
- use live responses and the OpenAPI contract, not illustrative fixtures, as the integration reference.
Continue building
Section titled “Continue building”The fastest next steps are:
- run the complete AvelinLabs API examples repository;
- review the Getting Started guide;
- inspect the API reference;
- compare Job Classify and Job Analyze;
- evaluate Workforce Evidence Packs;
- learn how to interpret confidence, uncertainty, and review guidance.
The first successful request proves connectivity. The useful integration begins when your application can explain what the response supports, what remains uncertain, and when a person should review the decision.